Soldering Part 1: What am I meant to do with this hot pointy stick?
This guide is intended to be an introduction to:
What is a PCB?
Choosing solder
Flux
Soldering iron tips & temperatures
How to make a good joint with step-by-step pictures
Close up soldering demo video
A printed what?
A Printed Circuit Board (PCB) is a lamination of conductive and insulating layers that are etched, drilled, routed, plated, coated and silk screened to create the desired electrical circuit with convenient mechanical (and sometimes artful, see Boldport) properties. The PCBs we use at Rakit are simple 1.6mm thick 2 layer boards with white soldermask and black silkscreen. Exposed copper on pads and holes are plated or coated to stop the copper oxidising and ensuring the ready adhesion of solder during assembly. Our boards are usually coated with lead free solder in a process called HASL (Hot Air Solder Levelling), but sometimes we use gold plating for decorative/tactile purposes.
Choosing A Good Solder
The SAC305 solder we supply with all our kits has the following attributes that we recommend when choosing a solder:
*Low melting point
* Fast flow (high flux content)
*Clear residue
*Lead free, for health reasons (although leaded solder will generally be easier to solder with!)
When choosing your own solder, you may want to consider the thickness. Too thin and you will need to feed a long length of solder onto each joint. Too thick and you may end up putting down too much solder.We supply a 0.7mm diameter solder because, in our opinion, it’s the perfect thickness for good control when soldering the joints on our PCBs.
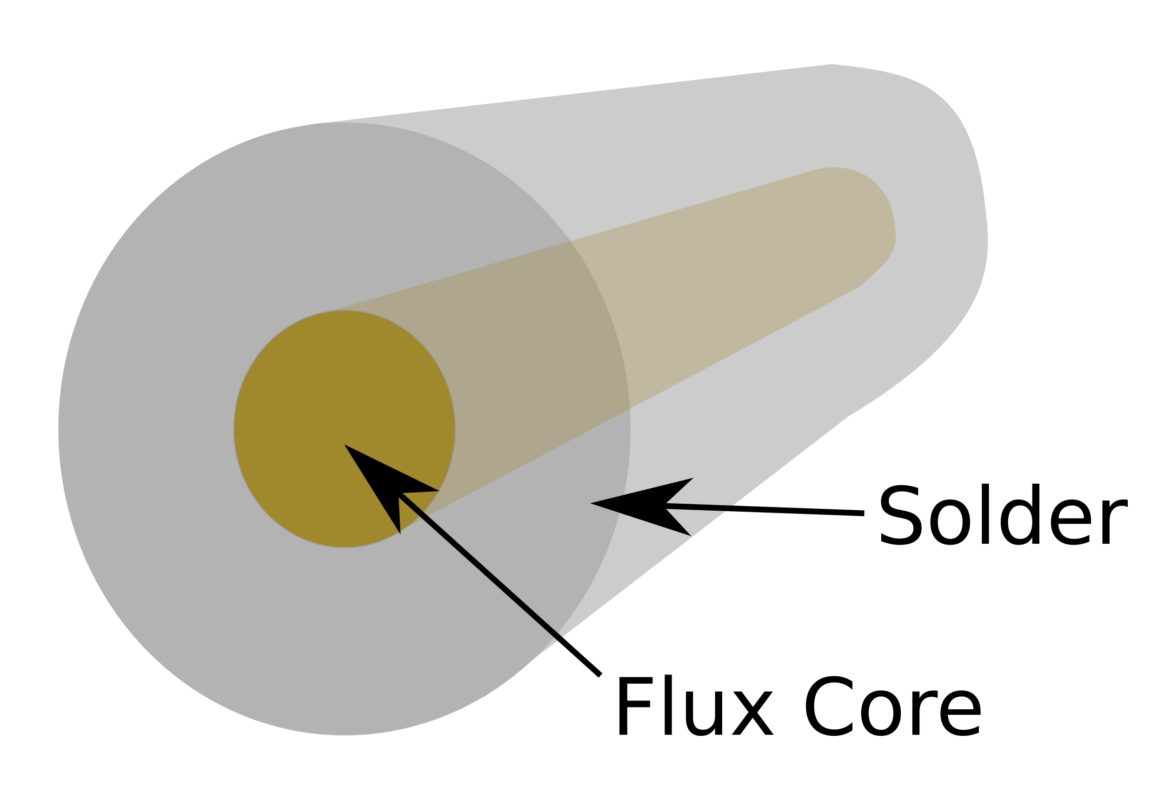
FLUX!?
After finishing a soldering joint there is often a residue, this is flux. Solder typically has a flux core, the flux is there to increase adhesion of the solder to oxidised/corroded surfaces. Flux is corrosive at soldering temperatures and works to strip away a thin layer of metal oxide that is always present on solder-able surfaces. Flux residues can be cleaned off with isopropanol alcohol or circuit board cleaner.
Soldering Tips (pun intended)
Soldering tips for general purpose through hole components come in a few shapes, our favourites are the round and chisel shaped type. Given the choice I would opt for the chisel type as it allows the user to get much better contact with the flat area for thermal transfer, but in a pinch the round type tips should work nicely too.
TIP: Use the largest iron tip you can get away with, the thermal mass in the tip helps greatly!
Soldering Temperatures
Our irons are set to 350ºC for lead soldering and 380-420ºC for lead free solders. The tip temperature has to be a lot hotter than the melting point of the solders themselves to properly activate the flux and wet the pad and component leads properly. The tip temperature also helps to compensate for the poor thermal contact between tip and board and the thermal losses involved.
Wetting
Wetting of the solder is achieved when the solder has melted sufficiently to adhere properly to the pad and lead. When the solder becomes liquid it coats and penetrates the copper surfaces and forms a new alloy at the junction.
Soldering Step-By-Step
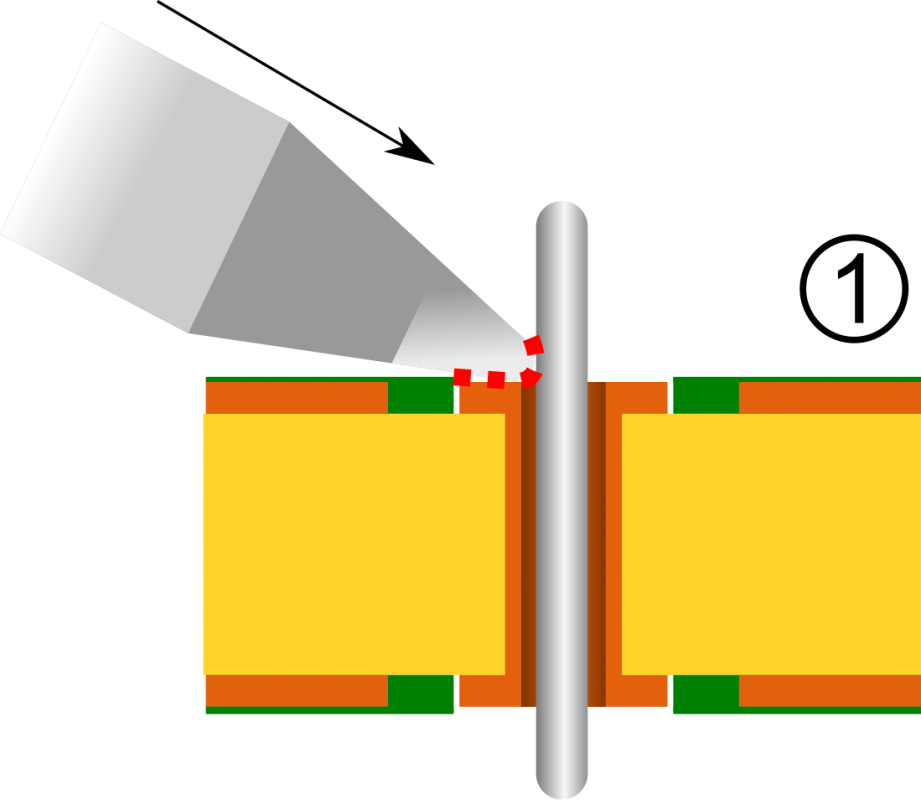
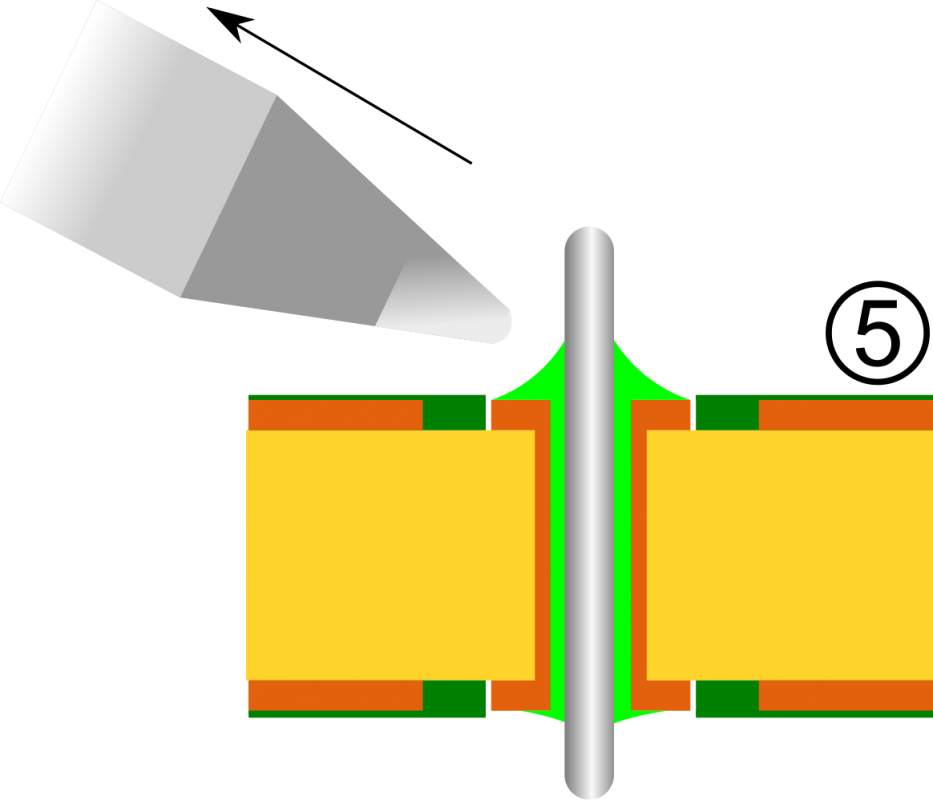
The whole soldering process, with practice takes around two seconds for a typical joint. The process I use has been broken down into 5 steps.
Introduce the iron to the joint to be soldered and apply light pressure.
The irons tip should be making contact with both the pad and the component leg.
Apply a small amount of solder between the iron and pad and then continue feeding into the joint, but away from the iron.
Solder is being freely accepted by the joint.
Solder has fully wicked into the joint and there is a smooth concave surface between pad and pin.
Remove the solder from the joint.
Quickly after removing the solder, remove the iron.
You are now the owner of a well formed, shiny solder joint.
Here is a short video of a joint made using an iron set to an appropriate temperature with a chisel tip. Notice that each joint takes about 2 seconds.
And a hi-resolution image of the completed solder joint as shown in the video.